NimOS Installation Guide
NimOS Auto-Update
In theory, NimOS will pop up a window upon shutdown whenever an update is available: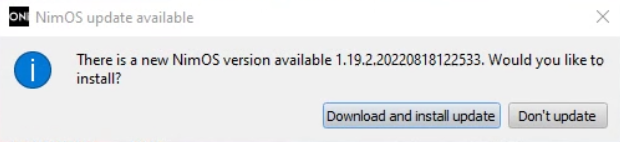 It is recommended to perform the update. Click on Download and Install Update to proceed with the update. The installation process will be identical to NimOS Software Installation. However, there are two important things to bear in mind:
- Whenever a new version of NimOS software is installed, the older version will be kept if a new folder name is given to the newer version. To remove an existing NimOS software:
- Navigate to "C:/Program Files/OxfordNanoimaging". Please be sure to uninstall the correct version - it is recommended to specify the version number in the folder name during installation to help identify the version.
- Run the uninstaller "unins000.exe" and click on Yes in the pop-up window to start the uninstallation process. Note that if the same folder name is given to the newer version, the older version of NimOS software will be overide.
- The microscope will not be completely shut down unless a decision is made regarding the update. If you do not want to proceed with the update, be sure to click on Don't Update, otherwise, the microscope will not be fully shut down.
- Navigate to "C:/Program Files/OxfordNanoimaging". Please be sure to uninstall the correct version - it is recommended to specify the version number in the folder name during installation to help identify the version.
- Run the uninstaller "unins000.exe" and click on Yes in the pop-up window to start the uninstallation process. Note that if the same folder name is given to the newer version, the older version of NimOS software will be overide.
NimOS Software manual Installation
To get a NimOS installer, please raise a ticket to our Support team.
- Once the installer has been downloaded, navigate to the download folder -- "C:\Users\ONI\Downloads" when accessed on the Nanoimager laptop. Double Click on the NimOS executable file (.exe). A new window will appear with the name Windows protected your PC. Click on More Info to proceed.
- A new button will appear with some additional information. Click on Run Anyway to start the NimOS installer.
- In the NimOS installer window, click on Next until it prompts the user if they would like to create a shortcut. Tick the checkbox to proceed with the installation. It is highly recommended to specify the patch number in the folder name. For example, "C:\Program Files\OxfordNanoimaging 1.19.1".
- During the installation process, the NimOS installer will install the required libraries and dependencies through the Windows command prompt. Once the installation is finished, you can start the NimOS software (Nanoimager.exe) from the desktop if Create A Desktop Shortcut is checked. Otherwise, you can start the NimOS software from the installation root folder.
NimOS Firmware Update
- In NimOS, Navigate to the Acquire tab and click on Connect To Microscope to connect to the microscope.
- In the process of connecting to the microscope, the system will check that the latest firmware has been installed. If not, the user will be prompted to install the latest version.
- If No is clicked, nothing will happen and NimOS will not connect to the microscope until the latest firmware is installed.
If Yes is clicked, NimOS will install the latest firmware and a new window will appear to show the progress. - Once NimOS has finished updating the firmware, click on Connect To Microscope again to reconnect to the microscope. If the installation of NimOS and the firmware was successful, no error message will appear and NimOS will connect to the microscope.
Python 3.6.6 Installation (if required)
The current NimOS software requires Python 3.6.6 to install the firmware. To check the Python version of your default environment, type python --version in the Windows command prompt and press Enter to print out the information:
If the Python version is 3.6.6 or later, skip to the NimOS Firmware Update.
If the Python version is not 3.6.6 or later, install Python 3.6.6:
- Download the required Python release from here (e.g. Python 3.6.6) and run the downloaded installer.
- In the Python installer window, check Add Python 3.6 to Path and click on Install Now to start the installation process.
- Once the installation is finished, confirm the Python version is correct in the command prompt and proceed with the firmware update. If the Python version is still not correct, check the System Environment Variables. Ensure that the root folder and the "Script" folder of Python 3.6.6 are at the top of the user Path list:

If at any point you are having issues with the installation process, please do not hesitate to contact the CX team.